
Narrow film unfolds its effect only in real projection. And for that to work and be fun, the projection image on the screen must be large and bright. And here savings are made far too often!
While the active 8mm filmer is still willing to spend increasingly large sums of money on a top camera and film material, he occasionally invests again in professional maintenance of the equipment, but little he usually invests into ideal projection equipment.
Hardly any other factor is as decisive for the subjective perception of quality of the viewer as the image brightness. If it increases, the contrast automatically increases, the colors shine more, more details become visible in the shadows and subjectively the image sharpness also increases. A bright projection image is therefore worthwhile.
The achieved brightness of the projected image depends on several factors:
- The type of light source (lamp) in the projector
- The projection lens used
- The claw speed and the angel of the rotary shutter
- The projection screen’s surface
Today it should be about the first point: The “cold light mirror” lamp, as it is used in probably all commercially available Super 8 projectors. The following types of lamps are and were common:
- 8 volts / 50 watts
- 12 volts / 75 watts
- 12 volts / 100 watts
- 15 volts / 150 watts
The 12V/100W variant probably had the greatest distribution. Few Elmo top models with often four-digit prices today also use 24V lamps with 200 or 250 watts, whereby the design does not provide much more light, but all the more heat. The 15V/150W lamp has unfortunately only been used in a few noble projectors; such as the Bauer studio series, the rare Agfa Sonector S and a few more.
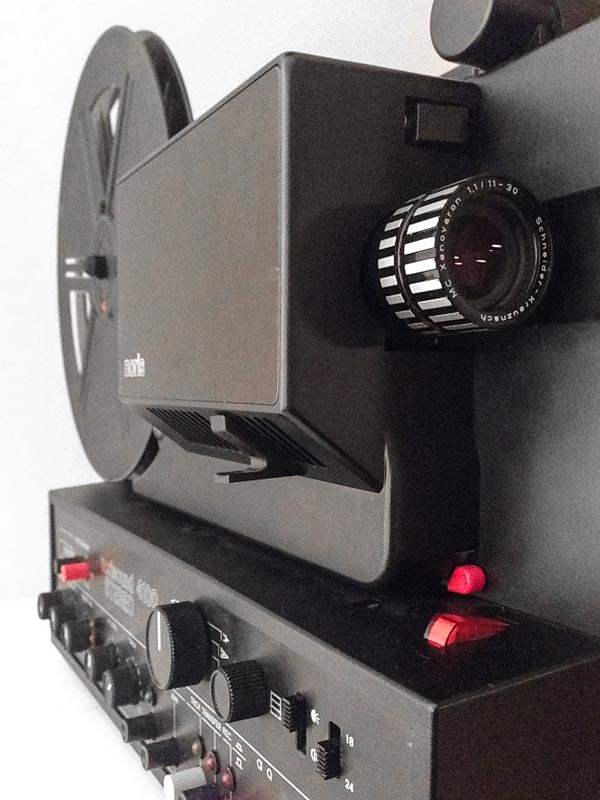
And this is exactly where the proposed modification comes in: The form factor of 15V/150W lamp and 12V/100W lamp is identical! But if even my little Noris President from the 60s ran with such a 150W lamp, why should a much nobler projector from the late 70s only be able to cope with a 12V/100W lamp? And if my (unfortunately chronically quite blurry) plastic bauer t610 runs smoothly and inherently with a 150W lamp, why shouldn’t my mechanically much more convincing Norisound 4100 do the same? Its essential parts are at least made of metal.

First, I got a powerful switching power supply with 15V stabilized output voltage and 11A power supply to be able to perform some tests. After that, I measured the temperature in the image window and watched it develop over 15 minutes. The result is simple: If it gets up to about 100° warm with a 12V/100W lamp, it gets 150° warm with a 15V/150W lamp. Both temperatures are uncritical, as the film only stops there for a fraction of a second. At least in my Noris, the temperatures of the film track and lens carrier remain completely uncritical, more than well hand-warm there is nothing even in 18 gear after half an hour. So: Promising! Should an undesirable “hotspot” still appear after the conversion, additional cooling would still be possible. Today’s fans are always quieter as well as the quietest film projector.
The conversion
… but then turned out not to be quite as trivial as initially suspected. For example, it is essential to avoid the new lamp still lit when the projector itself is already stopped — this would burn holes in the film and cause further damage, because a stationaries projector has no cooling. Also, some projectors have a lamp preheating, which not only protects the lamp, but also allows a comfortable starting of e.B starting marks before the projection. Last but not least, the projector should still be able to be operated with 12V if you do not need the larger amount of light or do not have a suitable lamp at hand.
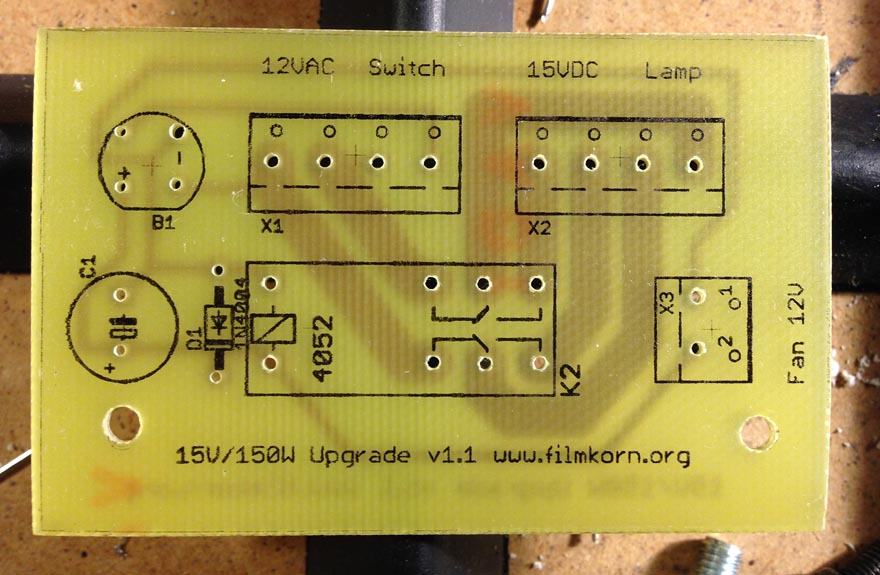
The solution is a simple, small circuit that is very universal and should be usable in virtually any projector:

The main trick is to simply turn on the new 15V lamp whenever the original lamp would have received its 12V operating voltage. For this purpose, the existing power supply of the projector is placed at the input “12 VAC”. From here, the current first flows through the (inactive) relay as usual via the “Lamp” connection to the projector lamp. Thanks to this trick, lamp preheating continues to work: The 2-4 volts of the same now simply flow to a 15V lamp instead of a 12V lamp.
It is different when the projector turns on its projection light and The switch connected to the “switch” connection is closed (i.e. our booster activated): Since projector lamps are usually operated with alternating current (especially for pragmatic technical reasons), the now incoming 10-12V (10V are a common saving circuit value) are converted into direct current by a bridge rectifier B1 and “screened” by the electrolyte capacitor C1 in order to no longer be wavy. This voltage causes the relay to tighten (i.e. switch): Instead of the previous 12V alternating current of the projector, the 15V direct current of our switching power supply is now on the lamp. The 12V of the projector are not used in this case, but are available, for example, for the operation of additional fans. If the projector now switches off, condenser C1 discharges abruptly, the relay drops off and our lamp is again only supplied with preheat flow. Voilà!

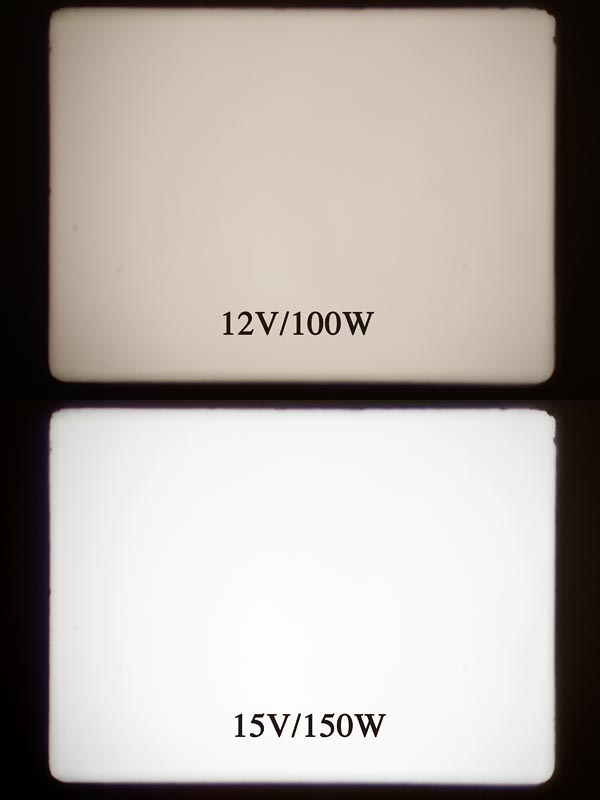
If that was difficult to understand, the projector behaves exactly as before. Only in demonstration mode can you switch the lamp a decent step brighter than before — the light gain is a good half f-stop at the 15.5V I chose, so about 60% more light than before. At the bottom, a graphic visualizes the difference very clearly.
Installation

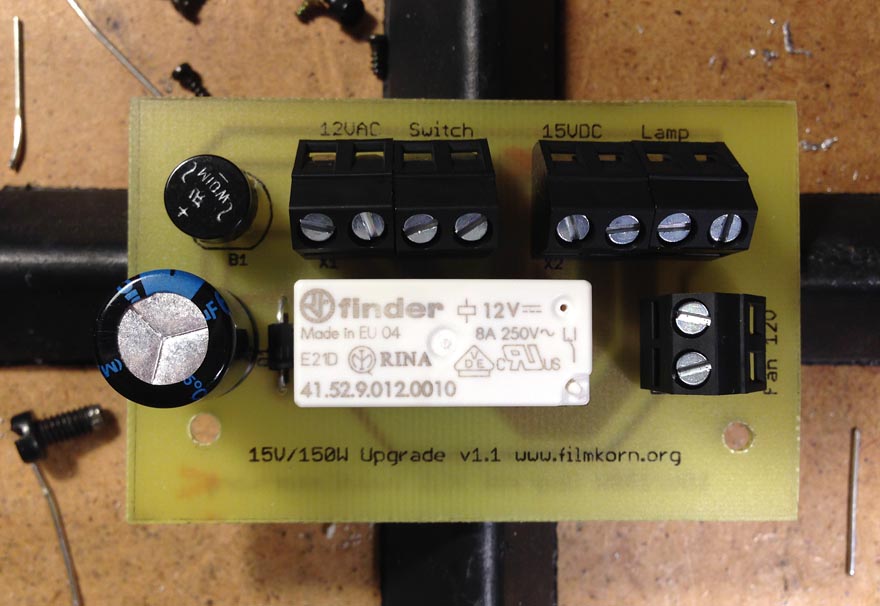
In order to get the eight connection cables cleanly wired, I designed a small, somewhat matchbox-sized circuit board. This can be easily attached to the projector housing with a screw or cable tie. The connection is then only a matter of a simple slotted screwdriver and a few minutes of patience: The lamp base is clamped to the connection “Lamp”, whose supply voltage to the connection “12VAC”, A switch that is attached to the outside of the projector housing to the connection “Switch”. The 15V of the switching power supply finally come to the connection “15 VDC” — the polarity does not matter. If you like, you can connect one or more fans to the “Fan” connection to cool your projector – if necessary. The fans then start as soon as the booster is active. If you switch off the booster, the 15V lamp is simply operated with 12V — which leads to about the same luminous efficacy as before the conversion, but with slightly redder light.


I am happy to share the EAGLE project with circuit diagram and board layout.


To visualize the really significant light gain, here is a comparison graphic:

The measured amount of light in the middle of the screen, at an image diagonal of 1.90m:
- 12V / 100W lamp (brand new, full throttle): 84 Lux
- 15V / 150W lamp (i.e. after conversion): 136 Lux


Related Posts